How To Install Kali Linux Offline On Android (1 Best Method)

Here are some tips for how to install Kali Linux offline on any android devices from where you need to download Kali Linux mg file
How To Install Kali Linux On Any Mobile- Install Kali Linux Offline- Install Kali Linux On Android- Install Any Windows On Android
How to install Kali Linux

How To Install Kali Linux On Any Android Device Offline

 Today I m sharing a very interesting trick for how to install Kali Linux on any android device. Install windows Kali Linux on android device. If you install Kali Linux on android you will feel that you are using computer on your android device. Let’s see.

Required Files To Install Kali Linux:

1.) Android Device.
2.) Root.
3.) Kali Linux IMG File (need to download from web).
4.) Root Explorer.(click to download from play store)
5.) ES File Manager.(click to download from play store)
6.) Linux Deploy (click to download from play store).
7.) VNC Android Viewer (click to download from play store).
8.) Master Mind
9.) Must Have 5GB Free External Storage on your SD Card.

Here Are Some Articles You May Like To Read

How To Root Any Android Device Without Bootlock

How To Enable Unread Count Badge

Downloads:

1.) Kali Linux IMG file:- Go this link and download Kali Linux IMG file (choose kalilinux.BASIC.ext2 size 723MB) {If automatically download not starts then click on DirectDownloadlink}.
2.) Root Explorer for extracting IMG file:- download from play store for link see above.
3.) ES File Manager for correct copying file path:- download from play store or giving link  see above.
4.) Linux Deploy for deploying Kali Linux IMG file on android:- download from here
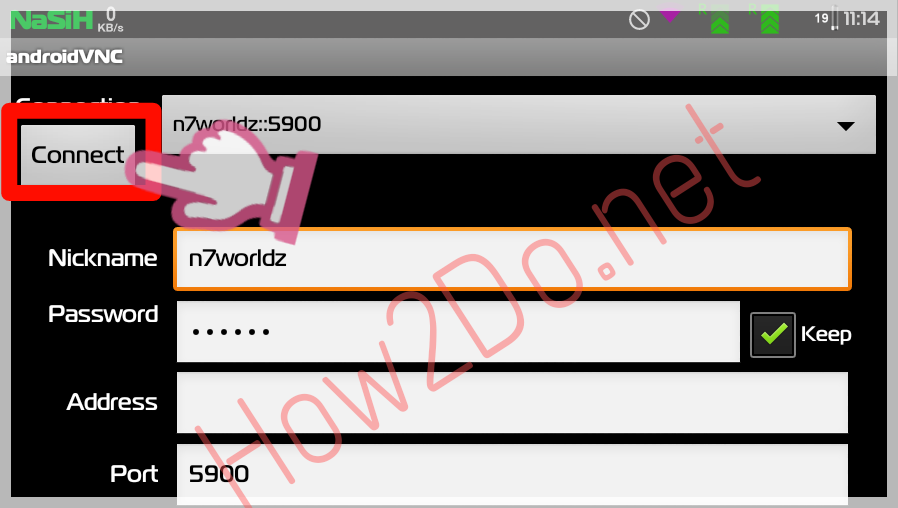
5.) VNC Android Viewer for lunching Kali Linux on android:- download link is on above.

[Remember: MustHaveFreeStorageOnYourSDCardMoreThan 5GB approximately 8GB]
PROCEDURE:

Trick For How To Install Kali Linux On Any Android Without Internet

Before Starting Trick Please Download All Files Successfully Given Above.

Steps:
Step1:- First download and extract Kali Linux IMG file through Root Explorer.
▶ Download and open Root explorer.
▶ Open kalilinux.BASIC.ext2.20131012.zip file and give root permission.
▶ then click on extract button. (It may takes up to one hour because its original size is 3.73GB means approximately 3,730 Mega Bytes).
▶ Wait Until The IMG file was successfully extracted.
Step2:- Download and Open Linux Deploy app.

Step3:- Click On Download Sign and set its manual setting (Properties:linux).

▶ Containerization method set it chroot
▶ Distribution must change it to Kali Linux

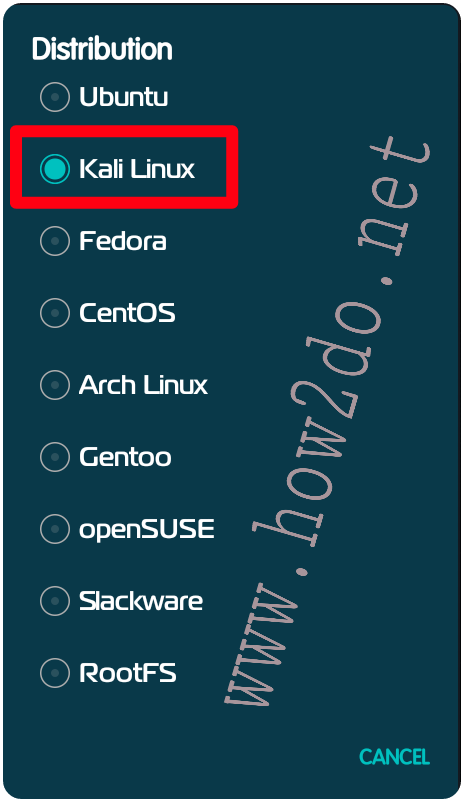
▶ Architecture set it to armhf
▶ Distribution Suite set it to kali-rolling
▶ Source path set it http://http.kali.org/kali/
▶ Installation type set it File

▶ Installation Path must copy the Kali Linux IMG File Location through ES File Manager and paste it here.
▶Image size (MB) change it to ‘0‘ it will be automatically calculate (Automatic Calculation).
▶ File System set it Auto or ext2

▶ User Name make your own user name.
▶ User Password create your own password (do not share your password to anyone).
▶ Privileged users set it root 
▶ DNS do not write anything on it it will be automatic detection
▶ Localization set it POSIX
▶ Tick on Enable on INIT and do not change anything on it.

▶ Enable MOUNTS (just tick mark on it) and do not change anything on it.

SSH enable it and do not change anything on it.

GUI must Enable it and click on “GUI Setting” .

(a) Display : ‘0’
(b) Depth (bits) – ’16’
(c)DPI : ’75’
(d) Width – “854”

(e) Height- “480”
(f) VNC Option left it on empty(dont write anythimg om it).

Step4:- Go back two times and click on 3 dots on upper right corner.
Step5:- Then tap on Configure.
▶ You will get a popup window and asking you Start Configuration of the container?

▶ You must tap on “OK” button

Wait Until Your Configuration Is Done It May Takes Less Then 10 Minutes, You Will See At Last Of Words That <<deployed .
Step6:- Now Click On Start(▶) and then click OK
 wait a minute it will be done in 60seconds, you will see the last word <<<start .
Step7:- Is to go back and open Android VNC on your android device.
Step8:- Set Up your VNC Connection.
▶ Enter your Linux user name on Nickname.
▶ write your Linux password on password.
▶ Address leave it empty
▶ Port set it ‘5900’ .
▶ Username leave it empty (do not write anything).
▶ Color Format change it to “24-bit color (4 bpp)” .
Step9:- Now click on Connect.
Your Linux Will Launch On Your Android Mobile or Tablet Automatically Without Internet.
[Note: Remember your Linux user name and password it may ask anytime when you lunch your Linux on your phone]

How To Lunch and closed Linux on phone?

 After installing lunx you need to closed it and again lunch it so learn How To Launch  And Close Linux On Android.

How To Launch Linux In 10 second without Internet?

1.) Open Linux Deploy app in your phone and click start.
2.) Then Open android VNC viewer.
3.) Enter your Linux user name on Nickname and Linux password on password.
4.) Click Connect your Linux will start (must check your color setting before clicking on start button, it must 24-bit color).

 How To Close Linux in 10 second without Internet?

1.) Move your mouce pointer to star button on left down corner.
2.) Click on star button.
3.) Now Click On LogOut.
You are done, How To Install Kali Linux on Any Android Mobile or Tablet without Internet do not forget to share and subscribe our email Notification. If you feel any problem must comment on below comment box.
[Note : How2Do.net Caption wrote in images because this site name was how2do.net now I changed it to The tricks.in]

Similar Posts

6 Comments

  1. Can you describe what the problem you are getting on download

Leave a Reply

Your email address will not be published. Required fields are marked *